
RESO By Mastering The Mix
RESO by Mastering The Mix is a new tool designed to help you identify and remove resonance from your mix. This can often be quite challenging, and when done wrong can really suck the life out of your music. There are many ways to address this problem. But for most of us just knowing where to start could be overwhelming. RESO steps in to aid us in a fast and intuitive way.
RESO is very easy to use and helps you quickly identify the resonances in your mix and helps you reduce them without losing the punch of the transients in your mix. The great thing about RESO is its versatility. I really like to use it on my instruments and vocals individually and make sure they sound correct. Then I can put RESO on my master bus to check the overall mix. The visual feedback and simplicity of the design make this a painless process.
You can grab a copy here: https://bit.ly/MTM-RESO (Plugin Boutique)
Intro – Dynamic Resonance Suppressor
RESO is a dynamic resonance suppressor that helps you quickly identify and resolve resonances in your audio.
When resonances build up to an excessive level, your music can sound harsh and unpleasant, often masking other elements that you actually want to hear. But, applying broad resonant reduction across your whole mix can take away the character of your audio, and if you apply too much reduction you’ll make the mix sound thin and reduce the punch of your transients.
RESO helps you identify which specific frequencies have a build-up of energy relative to your whole mix. It also guides you on how much reduction is needed to dynamically resolve the resonance without overdoing it. The high-quality filters deliver mastering-grade transparency, with automatic Q optimization to give you the most musical results.
There simply isn’t a faster or more effective way to musically resolve resonant issues in your mix.
Quick Start
Personally, I like to use RESO on my separate instrument tracks and vocals. Then I like to use it on the master bus to check the overall mix. RESO can be used to fix the resonances of any channel in your mix, whether it’s a vocal, a synth, percussion, busses, or your mastering chain.
Just load up an instance of RESO and play the audio that you want to analyse. Now click ‘Calculate Targets’ and RESO will then analyze your audio.
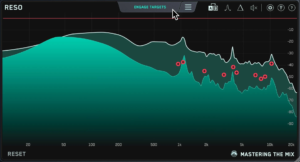
It will find the most resonant frequencies, and give you ‘Target Nodes’ showing how much reduction is suggested to transparently resolve the resonance. Meaning you won’t lose the punchiness of the transients.
You can now click ‘Engage Targets’ or click the targets one by one to engage the nodes and initiate processing. From this starting point, you can then adjust the nodes to suit the music and your taste.
New nodes can be added with a double-click, and can easily be removed or adjusted. This feels very similar to working with an EQ.
The Interface
By default, the display shows pre, post, and max peaks across the frequency spectrum. Listen to your audio and use the frequency display to help you locate any frequencies that sound disproportionately resonant in the context of the other frequencies.
Double click anywhere within the main window to create a node to initiate the dynamic reduction of a frequency. Position the node at the peak level at which you want the resonance suppression to start.
Mastering The Mix recommend aiming around the real-time ‘pre’ frequency display for transparent resonance control, and then dragging the node down from there for a more significant reduction.
Click reset to refresh the white line max peak analysis to get a clear visual of how the processing affects your sound.

RESO – Advanced Control
Adjusting The Nodes
Each node can be moved freely around the spectrum. To lock the frequency, hold control before moving the node. This will allow you to maintain the set frequency and vertically adjust the amount of dynamic reduction.
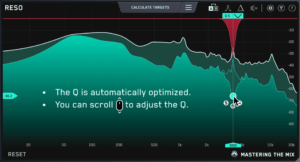
To lock the peak reduction and adjust the frequency, hold ‘shift’ before moving the node horizontally.
When you create a node, the Q is automatically optimized to sound great for that frequency. If you move the node around, it will automatically update the Q. You can scroll whilst hovering over a node to adjust the Q to suit the music and your preference.
You can click and drag to select multiple nodes and adjust them simultaneously.
Hover over a node to reveal the solo, bypass, and delete controls.
The Reso Toolbar
A/B
The A/B button allows you to quickly switch between two different states of the plug-in. This enables you to try a different approach to your audio to see what works best.
The arrow above the A/B button copies the active state to the inactive state. This allows you to keep the current settings of the plugin in the inactive state and make a few adjustments in the active state to see if you can improve the sound. You can then jump between A/B to see which you prefer.
Frequency Sweeping
RESO makes locating resonances by ear easier than ever. A classic way to identify resonances is to create an EQ boost with a thin Q bandwidth and sweep around the frequency spectrum and listen for a problematic frequency that jumps out at you.
This is how I would locate resonances by ear before I discovered RESO, and I like that i can still do this within RESO so I can compare its results with my own.
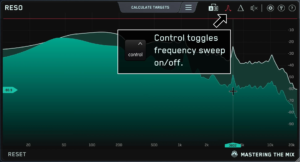
When the frequency sweeping icon in RESO is activated, your mouse position will determine which frequency is being boosted. You can then engage nodes on the fly when you identify a resonance.
Hold ‘control’ to toggle the frequency sweeping on and off.
(Note: Almost every frequency will sound unpleasant when boosted with a high Q. Use this feature with caution to pick out disproportionately resonant frequencies).
DELTA
You can click the Delta button to solo what RESO is removing from your mix. This allows you to be sure all processing has a positive effect on the sound of the mix and is getting you closer to your desired sound.
Or use the Bypass button to preview the before and after results of the processing.
INPUT / OUTPUT GAIN
When you create a node, it’s at a specific peak level that relates to the input volume of the signal. If the input gain changes (due to changes in your processing chain or gain of the audio), then the amount of processing applied by RESO will also change. This would also be the case for any compressors in your chain that are triggered by a threshold.
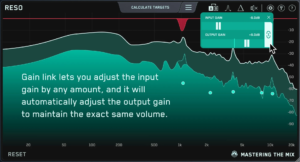
There’s a quick fix for this in RESO. You can click the ‘link button’ which will allow you to adjust the input gain by any amount, and it will automatically adjust the output gain to maintain the exact same volume. Very handy!
You could use this like a wet/dry slider. Start by clicking the input and output gain link button. Then push the input gain up for more resonance reduction and lower the input gain for less resonance reduction.
RESO’s Super-Transparent Filters
There is a balance in filter design between various factors including CPU use, phase distortion, transient smearing and pre or post-ringing.
Mastering The Mix have spent a great deal of time researching and developing what they believe to be the most perfect achievable filter for the purpose of resonance removal. RESO’s filters have a very near-linear response with far less phase distortion than equivalent minimum phase filters.
Also, for higher Q values, RESO’s filters produce much less pre or post-ringing of transients than comparable market-leading filters.
In the plot below, you can see a step response of RESO compared to a market-leading filter. The step response can be thought of as how the filters react to a transient such as a snare drum.

The plot shows clearly that RESO’s filters add only a very small amount of pre and post-ringing to the step signal, indicating that transients in a mix or channel will be left virtually unharmed in terms of ringing and smearing.
Overall these factors also contribute to much less total harmonic distortion, which again ensures the maximum clarity and transparency of RESO.
RESO By Mastering The Mix Links
If you would like to grab RESO by Mastering The Mix then please check it out using this link, which helps support Producer Life, thank you.


